by gregtpayne | Sep 15, 2018 | Bread
From King Arthur
Sourdough Rye Bread Recipe
DOUGH
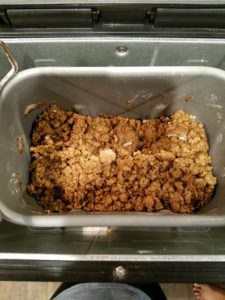
OK, this was an epic fail. Two things… I didn’t watch the kneading and I think we should have used the white starter. We’ll try again but this was our biggest failure yet. Hopefully the Olive will turn out better.

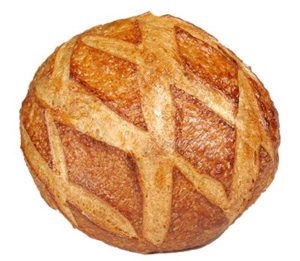
We actually forgot to make dough until around 1 pm today so hopefully starter that hasn’t been fed for 15 hours is still good. We put a cup of sliced olives in when the timer beeped. We used the Irish guy’s recipe. We let it proof in the attic at about 81 degrees and it rose nicely after 3 hours. We shaped two loaves, one in the oval basket and one in the round (a rustic boule and a rustic oval). We’ll cook those 25-30 minutes, checking with a thermometer.
So what about tomorrow? We think we’ll try Jarad’s recipe with wheat flower, let it bake in the bread machine.
by gregtpayne | Sep 13, 2018 | Sourdough

Yesterday we made cinnamon raisin bread in the bread machine (including baking). It was a double batch made with honey. Our 2 lb machine handled it but it was a big loaf. Our oven baking has been going well, even if our recipes need work. Tomorrow I think we’ll try the ILoveCooking.com videos with Patrick Ryan.
How To Make Sourdough Bread Master Class
His ingredients (for 2 loaves) are:
- Flour: 800 grams (“of strong flour”)
- Water: 460 ml (460 grams)
- Salt: 10 grams
- Starter: 320 grams
Knead and Prove for 3 hours
Shape and Prove for another 3 – 3 1/2 hours (our temps are cooler)
He says bake 30-35 (I think ours need 25 but we’ll make sure by checking the internal temp, shotting for around 200 degrees (min 190).) minutes at 230 C but we are baking at 450 F which is little hotter. For our croche he says to bake for 25 minutes with the cover on and another 25 with it off. I think the pan loaves take about 45-50 minutes too. I’ll refine these temps. I think they’re also dependant on dough consistency and ingredients.
Now for the 100% Rye Sourdough
This is more difficult because it’s more pasty. He uses
- Rye Flour: 500 grams
- Salt: 10 grams
- Starter: 350 grams
- Water: 360 ml
Knead less than white flour. Don’t add extra flour. Just work it around for a couple minutes. Oil a bowl and your hands. Put it in bowl and prove for 2 1/2 hours. Take out. Shape. Dust basket heavily with flour. Put dough in basket, dust bottom and prove another 2 – 2 1/2 hours. Don’t score, let crack for 5 minutes. Bake 45-50 minutes (we’ll take temp after 35-40 minutes)
We’ve been using our bread machine to help us knead and proof dough and even bake. We have to customize the times so currently I’m using the following settings:
- Rest: 0:10
- Knead 20:00 (there is a beep 5 minutes before kneading completes for adding extra ingredients)
- Shape:OFF
- Rest 1: 6 hours
- Rest 2, 3: OFF
- Bake: 45:00
- Keep Warm: OFF
Our loaves are taking longer to bake in the oven. Somewhere between 40-45 minutes I think. I’ll start checking at 35. The bread machine seems to want about 45 minutes but I’ll verify that with a thermometer too.
King Arthur shows us how to feed your starter. She uses 4 oz (113 grams), leaves it out for an hour and then refrigerates it. The remaining question is how much starter to feed prior to making dough. Tonight we fed 1 cup of white starter (about 220 grams) and about 1.5 cups of rye starter (330 grams). The rye seems to rise much less but since we’re using weight now, I’m not sure that matters so much, however we do use more rye starter than white starter for dough.
Update: King Arthur’s method works great for making the levain (last feed of the starter before making dough). The 1 cup of white we fed last night and I think we could have gotten away with just a cup of the rye as well. We’ll do heaping cups of both. So it’s 1/4 cup first feeding, 1/2 cup 2nd feeding, 1 cup third and before baking. Make sure to give that last feed a good 6 hours before making dough with it and if you’re putting newly fed starter in the fridge, let it set out an hour to get going. Feed your refrigerated starter every week and your room temp starter every 8-14 hours (8-12 is ideal). That’s about it on keeping your starter fed.
by gregtpayne | Sep 11, 2018 | Sourdough

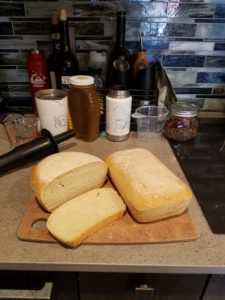
Well there you go, our first loaves, kneaded by Babs and baked in Pyrex pans. It actually didn’t taste as good as the bread machine loaf but it looks a lot better. It may be that the sugar and olive oil made the difference or it could be that we didn’t steam it properly, overbaked it … who knows. We’re happy because all 3 loafs turned out pretty good for a first attempt. We are keeping the starter at room temp for a couple of days while we play with baking. This morning we’re looking at options on how to keep starter fed, produce a levain, dough, the timing of all that … and then there’s the baking. This is fun!
Everyone seems to have differing opinions from the minimum of 3 feedings at room temp recommended by Cultures For Health (they are on the difficult end of the spectrum) to quick and easy methods that involve one feeding from refrigerated starter. We’re working on a compromise which is to feed our 1/4 cup refrigerated starter twice and then make the dough. The key is to give the starter (or levain which I’ll use to refer to the starter used to make the dough (final “feeding”) digest for at least 6 hours. We still have a lot of questions regarding times betweens feedings and dough making. We’re thinking the starter peaks between 6 and 12 hours (8 seems like a good peak) and that while you can go 24 between feedings or dough making, it loses potency after 12? We’re still learning. I think we’ll make our own YouTube video that puts all this together.
So today we’re going to try the cinnamon raisin bread from this YouTube video called Cinnamon Raisin Sourdough Bread – Bread Machine by Desert Hava Garden. She uses the following ingredients for 2 loaves of bread:
- Flour: 4 cups
- Salt: 1 tsp
- Cinnamon: 1 heaping tsp
- Raisons: 1 cup
- Milk: 3/4 cup (Almond or any kind)
- Honey: 4 tbsp
- Starter: 2 cups
She puts them in the above order and runs the machine at Dough only. After kneading and a 3 hour rise time. She then kneads just a little with the machine (punch down). She then greases two bread pans and divides the dough between them, rolling the dough into loaf shapes and setting them into the pans. She then covers lightly with seran wrap and lets sit in 72-80 degrees for 5 hours and puts them into the oven for 30-40 minutes (she does 40 but doesn’t tell us what temperature unless we missed it).
I think today we’ll try it in the bread machine, same programming as last time (Cycle 15?). We’ll add the raisins as an extra ingredient at the beep part way through the kneading. This is a lot of ingredients for one loaf but we have a big bread machine so we’re just gonna go for it.
We’ll also try some oven loafs. We’ll use the loaf pan and maybe try an artisan bread on our new baking stone. I think we’ll use Jarad’s recipe for that and kneed it in the bread machine…. which means we’ll need to do that first! Back later!
Oh wow, we just learned some great stuff from the Irish dude. We can proof our dough in the fridge overnight! Hooray! I’m learning a lot from this guy. Looks like we make dough, knead it, proof it for 3 hours, cut it in half and create your shapes (pans, proofing basket, etc) and let proof for another 3 – 3 1/2 hours or pop it in the fridge overnight and bake it in the morning. I gotta get this guy’s folding technique down because he does it at every phase. Great video from ILoveCooking!
First we’ll make some dough. This step will be the same every time. We’ve fed 200 grams of flour, water and starter twice and maybe 500 grams of each for the levain, let rest 6-14 hours and then make dough. I’m gonna take a stab at a recipe for either 2 artisan loaves or one big bread machine loaf
- 2 1/3 cups starter
- 3 1/3 cups flour
- 1 tbsp salt
- 2 tbsp sugar (optional)
- 2 tbsp olive oil (optional)
- 3/4 – 1 1/4 cups water (start with 3/4 and add as needed)
Bread machine Dough Only (Cycle 15 Memory 2):
- Rest: 10 min
- Knead: 20 min
- Shape: OFF
- Rise 1: OFF (or 3:00 for the first rise and punchdown)
- Bake: OFF
- Keep Warm: OFF
Soon we’ll try ILoveCooking’s Rye Sourdough Bread!
So here’s how the day went. I waited till 3 pm to make dough after feeding about 8 am. I was going to just put the above ingredients in the machine but I started mixing in a bowl, then poured it in, forgot the salt, let the machine knead for a while, started grinding salt all over the dough and let knead for another 15 minutes. I then took it out, put it in a bowl and let it proof for 3 hours in the attic upstairs where it was warmer. I then brought it down, cut it in half and put 1/2 in our new proofing basket and half in a loaf pan greased with ghee. I put them in the fridge, covered with towels for baking tomorrow. At 9pm tonight I’ll feed 2 cups of starter for tomorrow. Tomorrow I think we’ll try the cinnamon raisin bread, baked completely in the machine with Rise 1: 3:00 and Rise 2: 4:00.
by gregtpayne | Sep 10, 2018 | Sourdough

Today is the big day! We fed our refrigerated starter 3 times (way too much, will discard more next time) and are trying two methods, both from YouTube videos. The first is in the bread machine. I made a few tweaks to Jared Sergent’s video. Here’s my recipe:
- 2 cups starter
- 2 1/2 cups flour
- 1 tbsp sugar (Jared calls for 2 tbsp)
- 2 tsp salt (Jared calls for 1 and I think I’ll actually do 1 next time)
- 2 tbsp olive oil
- 1 cup water (more or less)
Bread machine programming:
- Rest: 20 min
- Knead: 20 min
- Shape: OFF
- Rise 1: 6:00
- Rise 2, 3: OFF
- Bake: 1:00
- Keep Warm: 1:00 (May set this OFF in the future, needs to be pulled when baking is done)
Jared doesn’t bake in a bread machine but I wanted to try this set and forget “Homemade” cycle on our new bread machine. You need to keep an eye on it though.
Because we had a ton of starter after 3 feedings, we tried making some from scratch using a Cultures For Health video. Babs did this herself and we did it just as directed, using one 1.5 liter pyrex loaf pan and one 1.2 liter pyrex bowl. We’ll let proof at least 6 hours and put them in the oven. I like how this guy bakes. He first bakes at 450 degrees for 10 minutes with boiling water for steam, then reduces heat and bakes another 35-45 minutes.
Right now the bread in the machine has risen nicely and is about to start baking. We might be able to use more dough with the machine in the future. The loaves are also rising on the counter. We’ll let you know how they turn out!
7:50 pm
The bread machine finished and the internal temp was around 109 so next time we’ll try 55 minutes OR use more ingredients! I think it could have been 1/3 bigger which means we might be able to use the Cultures For Health recipe in the bread machine. It does look ugly though so I have a feeling we’ll be baking in the oven. Maybe a little of both. Our loaves are rising nicely after 7 hours and we’re preheating the oven for them now. For tonight’s feeding I used 200 grams of each ingredient at 7:15 pm. That means I need to get up at 7 and either feed it or bake with it (I think that’s how it works). I discarded a lot, trying to get a handle on how much to discard on I guess the second or night before feeding. I’ll probably get up at 7 and feed it so we’ll have plenty of time to make dough, maybe after we surf.
9:30 pm
We baked the loaves at 450 degrees for 10 minutes with a pan of water on the bottom rack. Unfortunately we didn’t know we needed to pour boiling water into the pan to produce the steam, so we have a very hard crust. While we were supposed to bake an additional 35-45 minutes at 375 degrees, at 35 minutes, they were definitely done. The inside measured 110 degrees, the max. You want between 190 and 210 with 200 being perfect. Better to overcook than undercook though because supposedly wet dough gets rancid. No worries for us on that as all our bread today tested 210 degrees. We’re not going to try the loaves tonight to keep them fresh but the bread from the machine is delicious! Ugly but yummy! The loaf and round look really nice, especially the loaf shape. We’ll try artisan style when we get our baking stone.
by gregtpayne | Sep 7, 2018 | Sourdough

We’re trying something new here at Bab’s Buch, sourdough! Her friend Rose Ann Weber was kind enough to give us some sourdough “starter”. We’ve never done sourdough but we went to YouTube U and now we’re well on our way to adding another family of bacteria and yeast to our commune. Much like a SCOBY you have to feed your starter and if it’s hibernating in the fridge you need to feed it weekly. We fed our new starter today with flour and water, equal parts by weight. Here’s how we did that….
We put the new starter on our scale and found it weighed 97 grams. We added 97 grams of flour, 97 grams of water and stirred it all together. That’s it! Now here’s the part we aren’t real sure about. Do we need to leave it out and let it “proof” (rise) a little or can we put it right back in the fridge. We read somewhere that you should let it proof for 1-2 hours, then seal it and put it back in the fridge. So that’s what we’re doing. We’ll make a few batches of starter and start learning how to bake bread and make pancakes! Should be fun. Stay tuned!
From Cultures For Health ….
FEED REFRIGERATED SOURDOUGH STARTER ON A WEEKLY BASIS
If you do not bake often, maybe only weekly or monthly, it may be more practical to keep your sourdough starter in the refrigerator, in a tightly-closed container, and feed it once per week.
- Remove at least ¼ cup starter from refrigerator. Discard remaining starter.
- Feed starter with flour and water: If using a scale to measure ingredients, combine equal amounts by weight of starter, water, and flour. For instance, 50 grams starter, 50 grams water, 50 grams flour. If using measuring cups, combine 1 part starter, 1 part water, and a little less than 2 parts flour. For instance, ¼ cup starter,¼ cup water, slightly less than ½ cup flour.
- Cover; let starter sit for 1-2 hours at room temperature, until light and bubbly.
- Put a tight lid on jar and return to refrigerator.
- Repeat weekly even when not baking with your sourdough culture.


Recent Comments